Playing with Numbers in the MUD (Part 1)
Preface
This article is not specific to Information Security or covering any ethical hacking topic. Read on if you have an interest in learning about my journey on how I accomplished the goal of generating, collecting, and analyzing a specific set of random data.
It is important to note that this article makes no assumptions of a persons background or familiarity on any of the content presented. The jargon applied in this article provides links to non-affiliated sites and resources to provide a potential avenue to learn more on a given subject.
Part 1 of this two part post covers the methods and techniques applied to identify, collect, and submit our in-scope data into an event stream processing application.
Scenario
A key aspect to many games is the element of chance where the outcome, good or bad, is dependent upon a random fact outside the player’s control. From the video game perspective the player puts their faith that the random element is intentional and fair. We’ll be covering a specific game, BlackMUD, an online based Multi-User Dungeon/Dimension (MUD) and establishing the capability to analyze the outcome quality of the game’s random number generators.
To accomplish this we’ll be bridging some old school technologies with some more modern applications and services. In the old-school corner we’ve got the game itself with a C code base originating from the 90’s that is played through the Telnet protocol. In the more modern front we’ll be leveraging Mudlet as the game client, the cloud service LogStream Cloud as our data collection pipeline, and ElasticSearch/Kibana as the database and analysis tools.
The end result is to be able to analyze just how random the current functions really are.
Visualizing the Data Flow
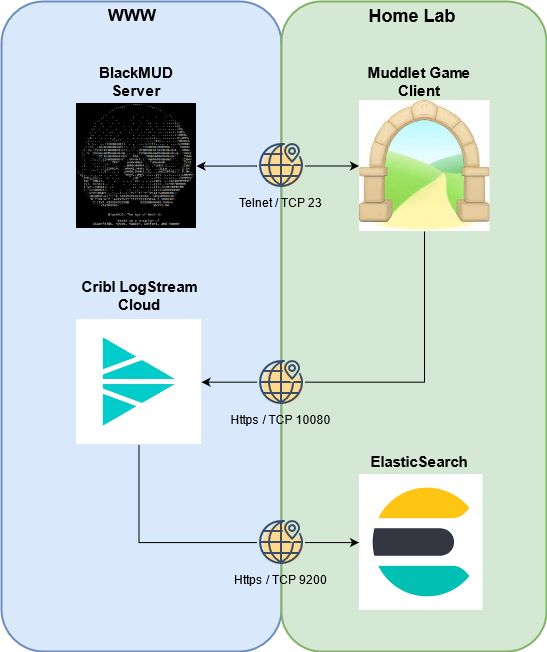
Before we dig into any of the bits and pieces that make this all possible lets take a look at the big picture. Our goal is to leverage the Mudlet game client as a means to tap into the data exchange between the BlackMUD Server and client. The tapped data will be transmitted back out to the internet to a SaaS product by Cribl and later passed downstream back into a lab environment and land into an ElasticSearch database.
Generating Data
The data in-scope is the output of three C functions from within BlackMUD: rand(1, 20), random(1, 20), and arc4random(1, 20). While all functionally serve the same purpose they each are rooted to different origin means on creating the random output. This article C/Randomization outlines the nature of this research well in covering that sometimes random isn’t as random as we would like or in some cases the results are too random.
By the end of this I intend to answer these three questions:
- Does the game’s current number generator have a balance distribution?
- Does an alternative random number generator provide better results?
- Do we need to evaluate other sources or methods for rolls?
To accomplish this we’ve set a command in-game that produces 100 rolls for each of the three functions. Here’s a sample representing this function’s code:
void do_random(CHAR_D *ch, char *argument, int cmd)
{
     int i = 0;
     char buf[MAX_INPUT_LENGTH];

     for (i = 0; i < 100; i++)
     {
          sprintf(buf, "%2d  |  %2d  |  %2d\r\n", rand(1, 20), random(1, 20), arc4random(1, 20));
          msg(buf,ch);
    }
}
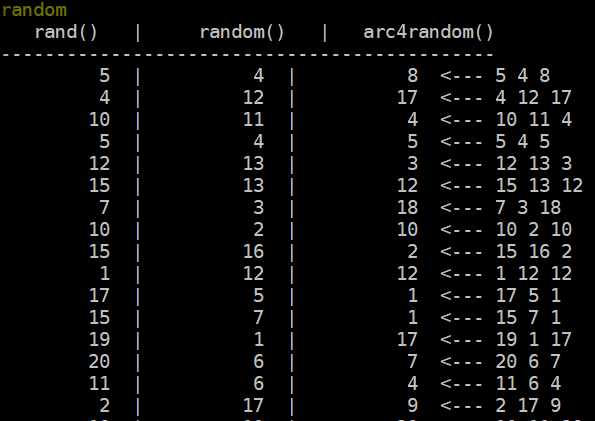
When ran in-game the output is presented to the game administrator like so:

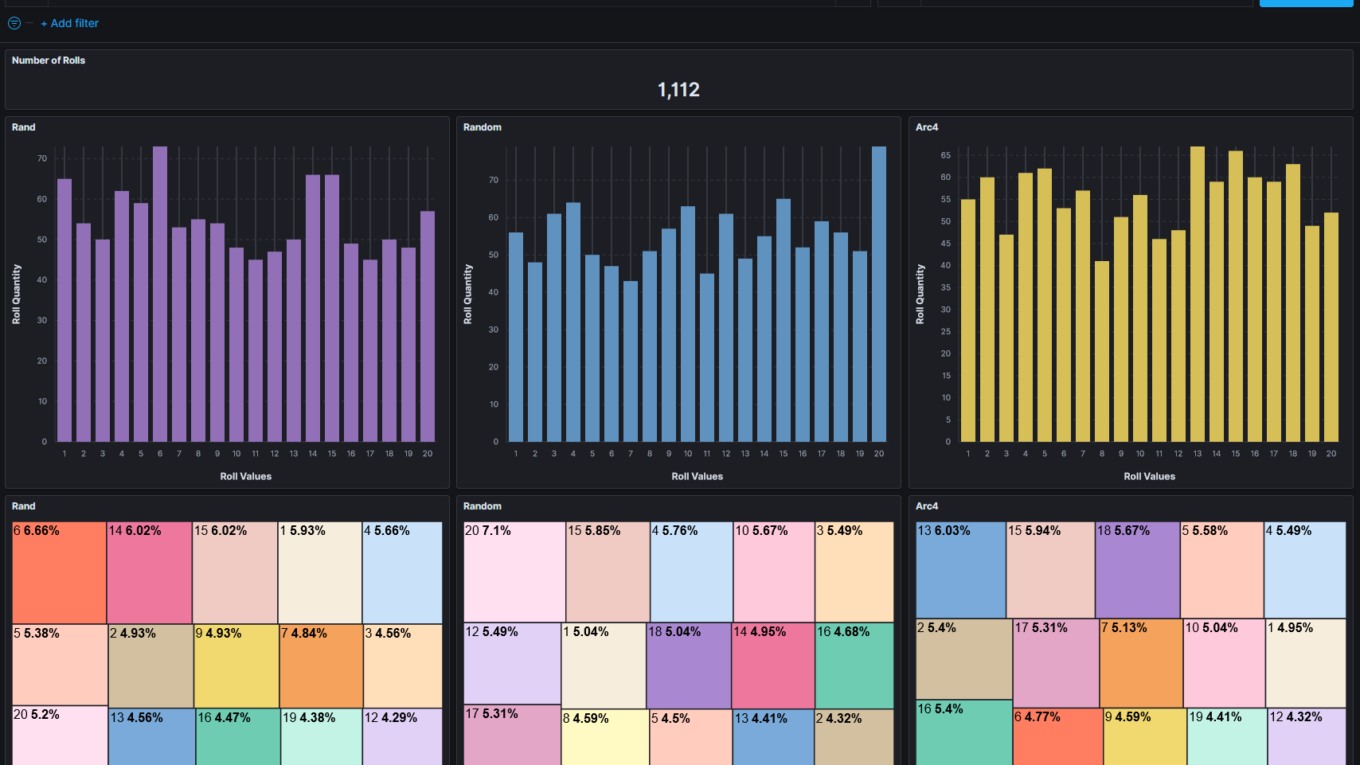
With this in place it’s time to piece together how we’re going to transition the data from above into the visualization below.
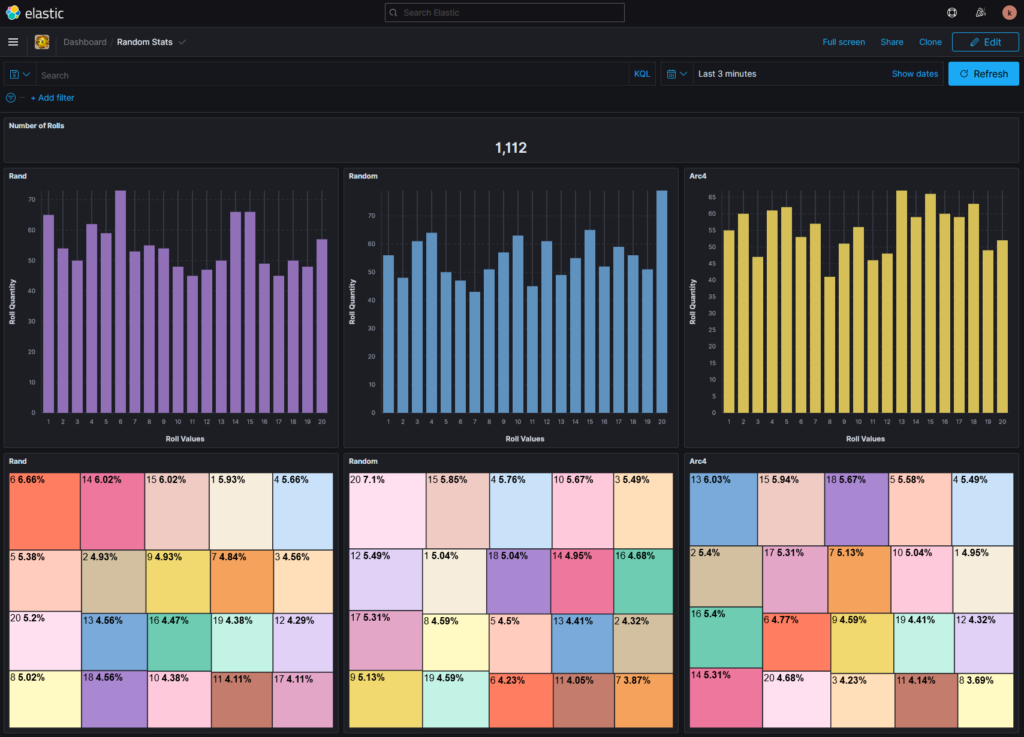
Data Collection
So now the question becomes… How can we get the data from inside a MUD’s game client and make it presentable in a way that supports our goals? Before solving extracting the data out of Mudlet it’s a good step to determine where it needs to go. Where this blog is specific to analyzing these random numbers, the component of collecting data from the game client can be leveraged for future endeavors. In our case the destination environment is the Elasticsearch database that expects data in the JSON format.
Taking a look at the data in-game, it is presented as a series of text in a set format. Note my use of the term int32 is referencing a 32-bit integer value that can range from -2,147,483,648 to +2,147,483,647. Certainly overkill where we’ll be working with numbers ranging from 1-20 but is a standard.
   rand()  |    random() |    arc4random()
------------------------------------------
    int32  |      int32  |        int32
    int32  |      int32  |        int32
The end result will be to transform the data above into the JSON schema below:
[{ "rand":int32, "random":int32, "arc4random":int32 },
{ "rand":int32, "random":int32, "arc4random":int32 }]
The Trigger
To begin collecting this data we are going to leverage some common MUD game client functions with Mudlet. The base functionality of a trigger is to define a criteria that when observed by the game client an action or series of actions will be executed (e.g. triggered). Mudlet offers a verbose trigger engine and with that I’ll be creating a single trigger that uses regular expression (regex) to match the in-game random roll data string pattern.
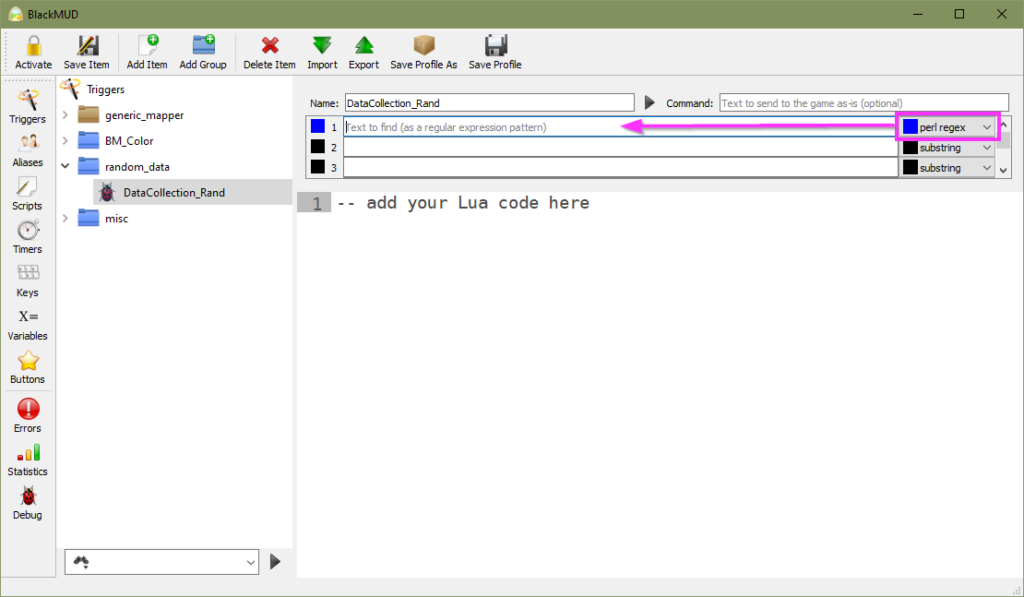
To get started we’ll work off the premise of our earlier data example with the target data highlighted in blue. By default a trigger will evaluate each new line to identify if that string matches the defined criteria.
   rand()  |    random() |    arc4random()   <-  Trigger Evaluation 1
------------------------------------------   <-  Trigger Evaluation 2
    int32  |      int32  |        int32      <-  Trigger Evaluation 3
    int32  |      int32  |        int32      <-  Trigger Evaluation 4
Based on the data we want to collect I’ve crafted the following pattern to accomplish our trigger criteria:
^\s{8,9}\d{1,2}\s{2}\|\s{9,10}\d{1,2}\s{2}\|\s{9,10}\d{1,2}$When applied to the example above we should expect the following results:
   rand()  |    random() |    arc4random()   <-  No Match
------------------------------------------   <-  No Match
    int32  |      int32  |        int32      <-  Match
    int32  |      int32  |        int32      <-  Match
While regex is its own independent deep topic we could delve on, we’ll save that topic for another day. A great resource to help understand and explain each component of the expression above is regex101.com. Here is a shared reference that is specific to our use case: https://regex101.com/r/0FE6Fw/2.
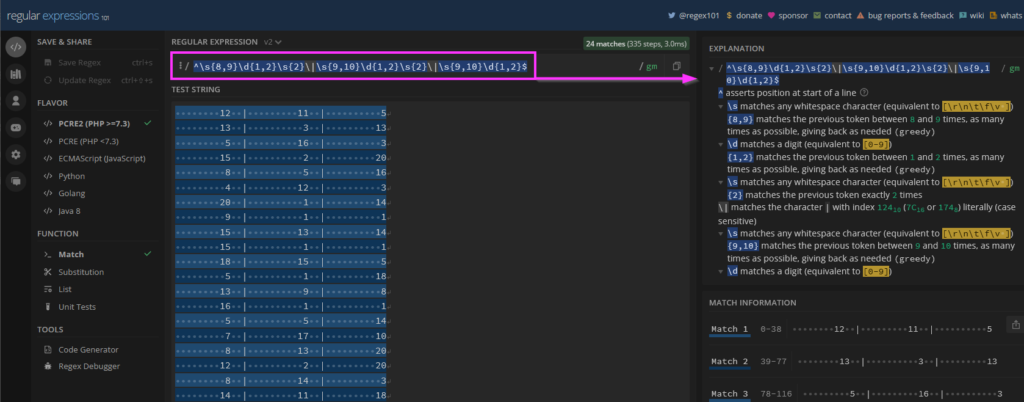
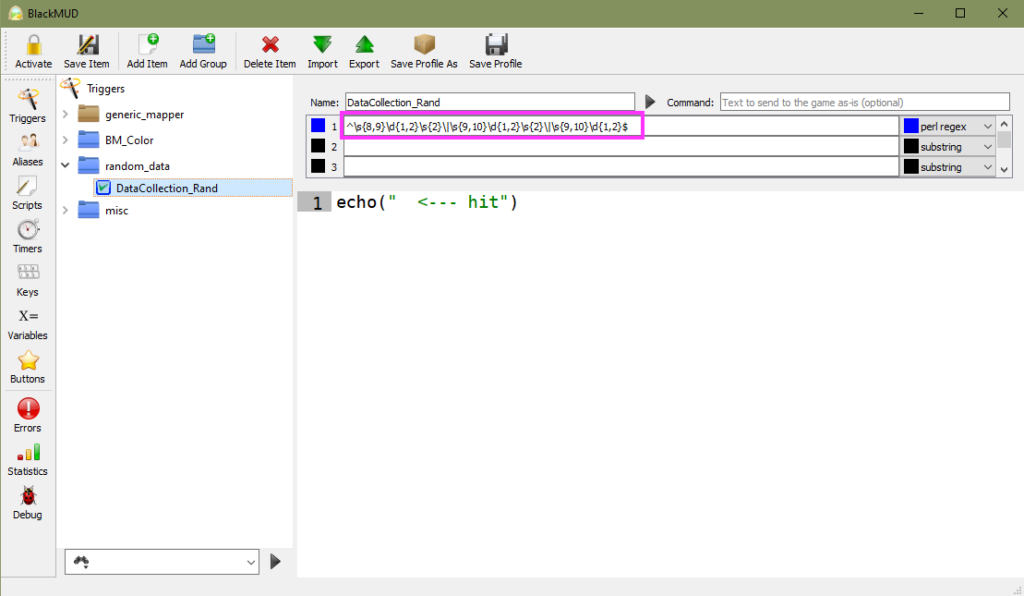
With a verified and tested regex pattern it’s time to apply this in-game in our Mudlet trigger. As a part of the test I’ve added in an action to echo the text ” <— hit” in-game.
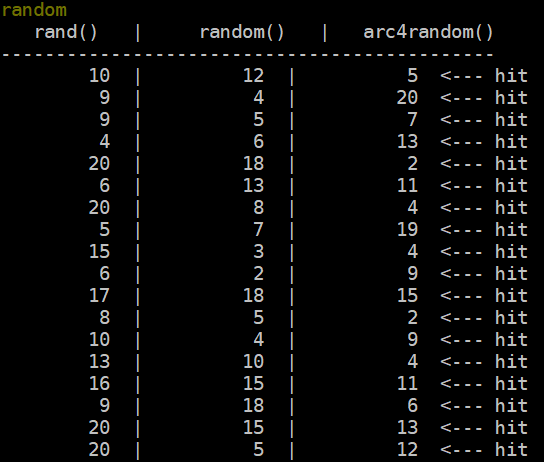
Testing our trigger is as easy as typing ‘random’ in game to call our game-driven function!
The last step to carry out here before moving on to setting data in motion is to give our game client the context of the data that’s important to us. To make this possible we’ll go back to our regex and apply named capture groups that will allow interacting with specific data we collect in the action aspect of the trigger. Through applying named capture groups we’ll be more readily able to reference these specific data elements when we’re ready to move our data forward.
Previous regex:
^\s{8,9}\d{1,2}\s{2}\|\s{9,10}\d{1,2}\s{2}\|\s{9,10}\d{1,2}$

New regex:
^\s{8,9}(?<rand>\d{1,2})\s{2}\|\s{9,10}(?<random>\d{1,2})\s{2}\|\s{9,10}(?<arc4random>\d{1,2})$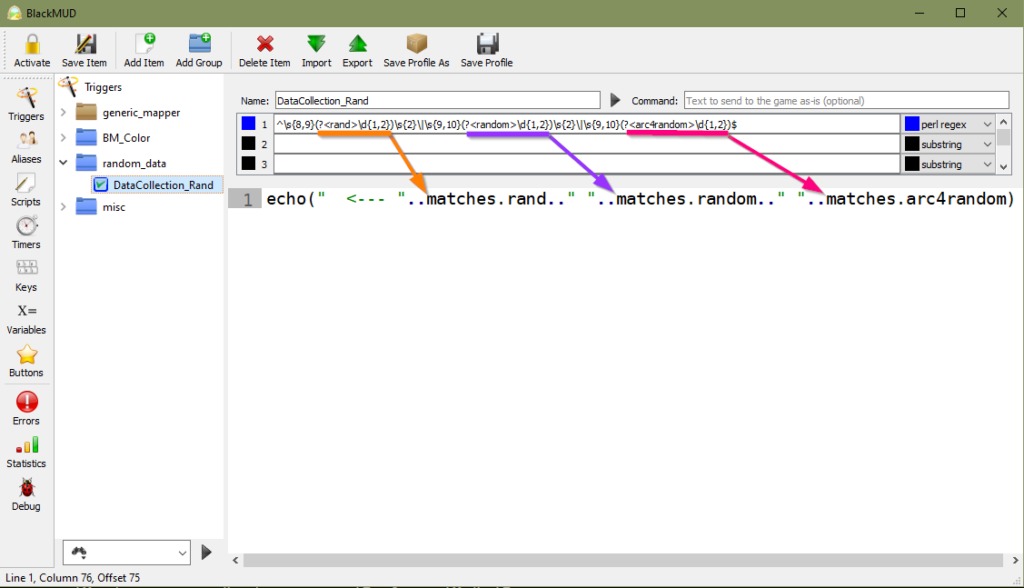
Data Transportation Goals
Now that we have establish a means to capture the data in-scope for analysis it’s time to pivot into how this data is going to go from our game client application Mudlet and into an Elasticsearch database. While it’s no mystery that we’ll be using LogStream Cloud; it does warrant a topic that lead to the use of this technology. The first goal in any data transport task is to assess your options and go with one that aligns to your goals. For this project I set the following goals:
- Easy
- Flexibility
- Availability
Easy
While the first option is almost always on the list for any objective; it’s worth defining to our project what would qualify as easy. For data transportation I define my easy marker as the following: ensuring data transportation is manageable, does not introduce unnecessary complexity, and where possible permits other aspects of this project to remain focused on their processes and goals.
Flexibility
From a flexibility perspective with relation to data we need to evaluate technical requirements. As we’ve qualified above, we have the capability to capture the three integer values that are important to our current use case. Reflecting on the project with alignment to flexibility; will we have future requirements to send other data from BlackMUD to Elasticsearch? Is the current data in a format that meets the destination’s expected data schema?
Availability
From an availability perspective it would be ideal for the transportation method to not operate off of hard set values/environmentals. Take for instance the use of DNS (Domain Name Service) as compared to IP addresses when accessing websites. DNS provides the easy means to address availability of a resource that abstracts the need-to-know of the down stream asset’s IP address.
With our use case for data transportation I define availability as being able to transmit data for collection from any Mudlet client that is able to connect to the BlackMUD game. This simple statement translates to the technical requirement that the solution must be available publicly on the internet.
- Easy
- LogStream provides a graphical interface for managing data sources and destinations.
- Leverages an internal git based change management system that enables control over applying updates, auditing changes, and rolling back when necissary.
- Flexibility
- LogStream has the features and functionality to support data manipulation while it’s in-flight from the original source to its destination.
- Add new data elements like timestamps or project tags
- Explicitly set data types to ensure field mappings in Elasticsearch are correct
- Remove unnecessary data to reduce bandwidth, reduce database size, and focus data
- LogStream has the features and functionality to support data manipulation while it’s in-flight from the original source to its destination.
- Availability
- LogStream is a Software as a Service product that is accessible on the public internet.
You’ll notice cost wasn’t wasn’t one of my key factors… what gives? We can call that requirement zero, because that’s what our budget is! Considering we’ve no room for encountering costs it is a point of no compromise. Thankfully the folks at Cribl are kind enough to offer free use of their LogStream Cloud service where the sole restriction is how much data we can process. Y’know what doesn’t generate an exorbitant amount of data? Games built on technology that is rooted from the early days of the Internet! Mainly because back in those days we were all dialing-up to our ISPs and cursing the stars when an in-bound phone call came in and booted us off.
Enough reminiscing. What say we move onward and…
Into the LogStream
Enough discussion on why lets cover some of the basics of the how we get to play with these random numbers! While this will not be a definitive how-to use LogStream Cloud, we’ll be covering the setup leveraged to make this integration a reality. The first aspect when it comes to connecting two information systems is understanding which protocol(s) we’ll be using and which TCP/UDP port(s) they’ll be leveraging. Thankfully this is pretty straight forward, aligning to our Easy requirement, where the product provides a nice summary defining your ingestion URLs, their protocols, and which type of data the service expects.
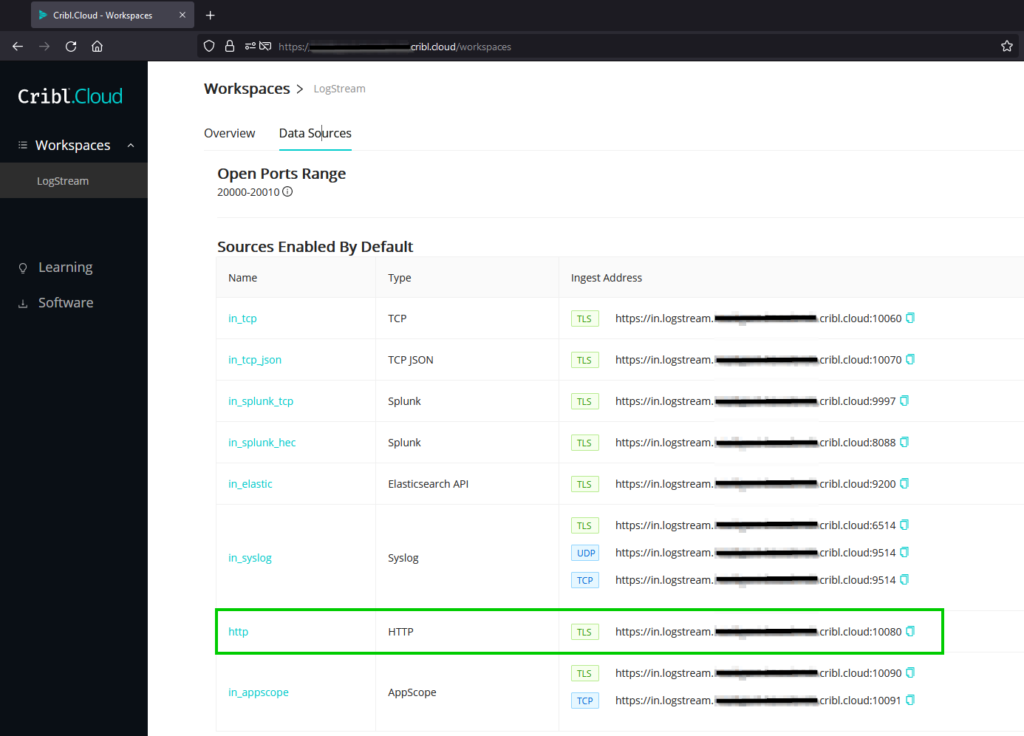
The Data Sources provides us what we’ll need to apply inside Mudlet to ship data to the Ingest Address defined for the HTTP data type at TCP Port 10080 with TLS.
When accessing the LogStream workspace you’re able to define Sources, Destinations, Routes, and Pipelines. We are going to step through setting up our configuration in this order: Source, Pipeline, Destination, Route. The reasoning behind this order was my own logical means to minimize time troubleshooting a platform I’ve not worked with previously.
- Source: Verify that data is being received. Once we have the data, we’re good!
- Pipeline: I want to ensure that I can quickly determine if I can transform the data in LogStream or if I will need to make changes to the data before it’s submitted to the Source from the Mudlet client.
- Destination: Reading through Cribl’s documentation indicated that a destination can be leveraged by multiple routes and that a destination can be configured prior to creating the route.
- Route: I thought of this as the policy that defines which messages from a source should be sent to a destination. With that in mind it makes sense to configure this last for this project.
Log Source Creation
From within the LogStream Cloud interface we’re starting out in the Configuration -> Sources component of this SaaS offering. And while this product can support a wide range of inputs from Syslog to Kafka, we’re going to configure a HTTP listening service that will receive our JSON data as HTTP Post messages for processing.
Here is an example of what this source looks like when configured in LogStream:
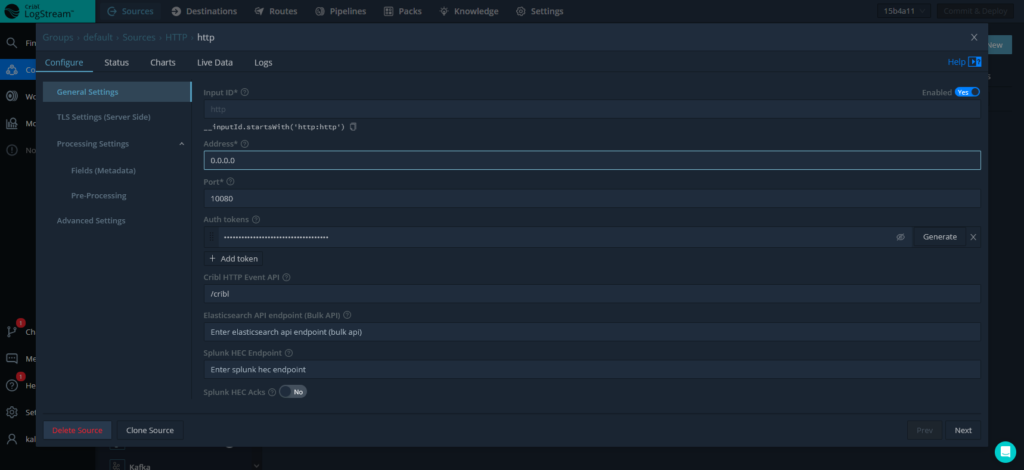
Note that for this cloud deployment the listening service is configured at address 0.0.0.0 as LogStream is automatically going to transpose this to my environment’s public DNS name (https://in.logstream.wouldlovetoshare.cribl.cloud) on my behalf. And while I could change the listening port service, our previous info gleaned from the Data Sources indicate that TCP port 10080 has all necessary firewall exceptions in place, so lets go with that!
Devil in the Details

It is good to note to check your additional info / tool tips as they sometimes contain pertinent details in order to make an integration work. Such a note was defined here for this source configuration indicating the Cribl HTTP Event API has an appended destination of _bulk after the /cribl. This results in the full target destination target mapping to: https://in.logstream.wouldlovetoshare.cribl.cloud:10080/cribl/_bulk
Also in the granular weeds is the TLS configuration for this endpoint. Since we’re leveraging a pre-defined data source for this SaaS offering, the TLS settings are managed as part of the tenant and we can completely omit defining these. Note if we wanted to submit data in the clear, for some strange unknown reason, we can still do this if we really wanted to. But lets save that for another day. For now lets save this configuration and move into validation!
Source Validation
Back to the Trigger
With the source configured in Cribl it’s time to return to the Mudlet and set our client up to post the data we’ve been collecting. For testing our new source we’re going to setup a means to take the data we are collecting in Mudlet and submitting that up to our Cribl Source. We’re going to dip into some of the better practices of leveraging Mudlet’s capability to contain our functional code in the Scripts segment of this MUD client. This allows us to re-use coded functions in various other aspects of the game client into other key areas like Aliases, Triggers, or even Buttons. We’ll be aligning script BM_to_Cribl to contain the code for fulfilling the HTTP Post requests containing our random data.
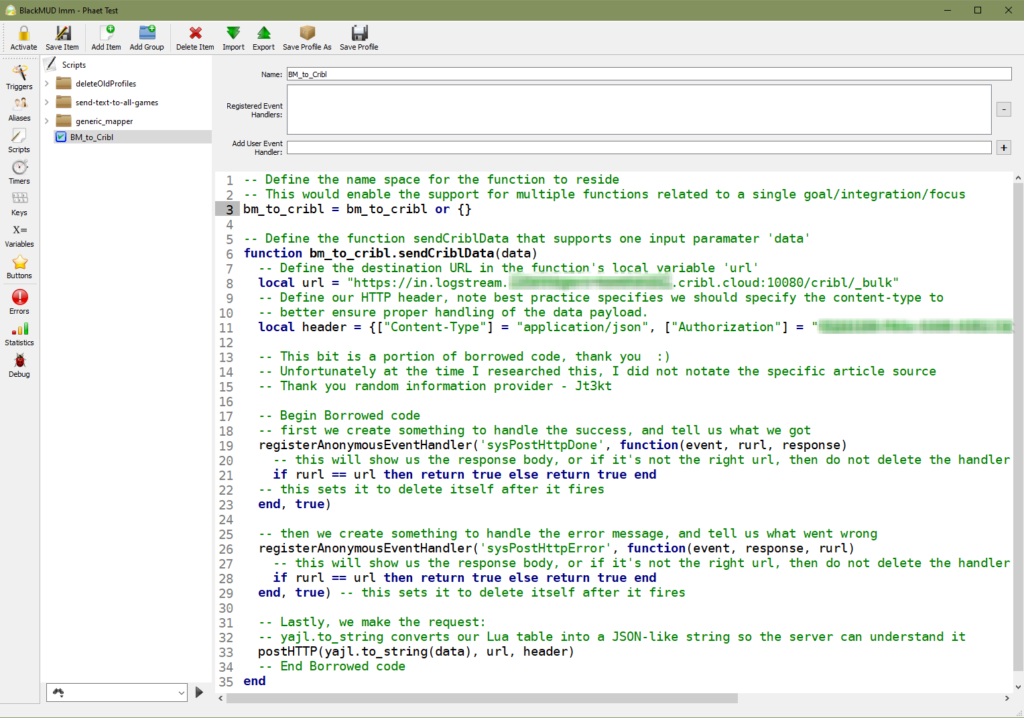
-- Define the name space for the function to reside
-- This would enable the support for multiple functions related to a single goal/integration/focus
bm_to_cribl = bm_to_cribl or {}

-- Define the function sendCriblData that supports one input paramater 'data'
function bm_to_cribl.sendCriblData(data)
  -- Define the destination URL in the function's local variable 'url'
  local url = "https://in.logstream.wouldlovetoshare.cribl.cloud:10080/cribl/_bulk"
  -- Define our HTTP header, note best practice specifies we should specify the content-type to
  -- better ensure proper handling of the data payload.
  local header = {["Content-Type"] = "application/json", ["Authorization"] = "toomanysecrets"}

  -- This bit is a portion of borrowed code, thank you  :)
  -- Unfortunately at the time I researched this, I did not notate the specific article source
  -- Thank you random information provider - Jt3kt

  -- Begin Borrowed code
  -- first we create something to handle the success, and tell us what we got
  registerAnonymousEventHandler('sysPostHttpDone', function(event, rurl, response)
    -- this will show us the response body, or if it's not the right url, then do not delete the handler
  if rurl == url then return true else return true end
  -- this sets it to delete itself after it fires end, true)

  -- then we create something to handle the error message, and tell us what went wrong
  registerAnonymousEventHandler('sysPostHttpError', function(event, response, rurl)
    -- this will show us the response body, or if it's not the right url, then do not delete the handler
    if rurl == url then return true else return true end
  -- this sets it to delete itself after it fires
  end, true)


  -- Lastly, we make the request:
  -- yajl.to_string converts our Lua table into a JSON-like string so the server can understand it
  postHTTP(yajl.to_string(data), url, header)
  -- End Borrowed code
end
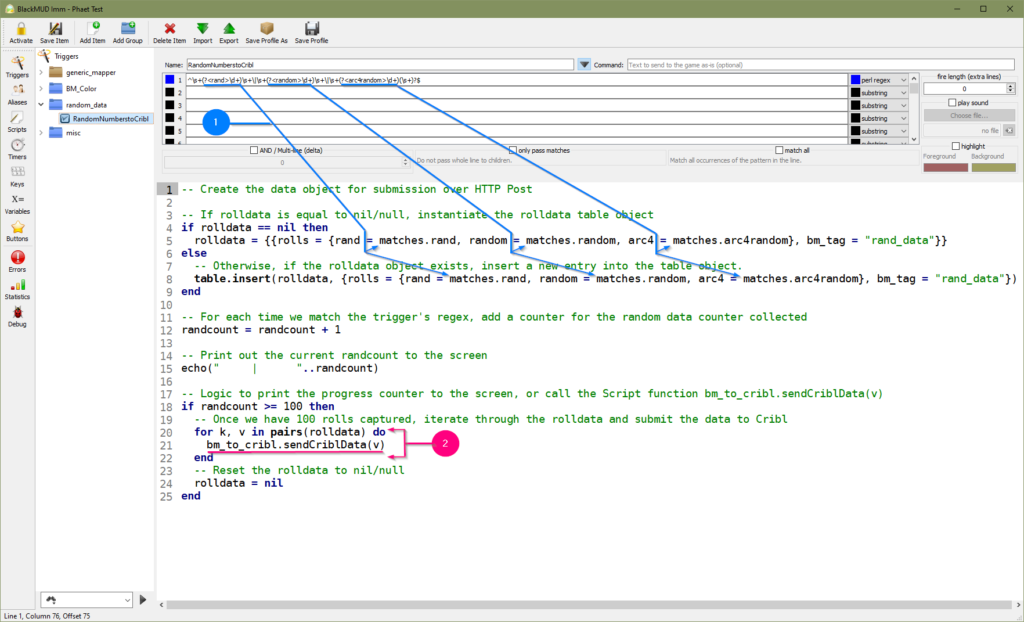
And with that, we now have the means to send data up to Cribl Logstream from Mudlet! So the last piece to connect these two independent dots is to apply this new function into our trigger. We’re going to re-use the original Trigger and update it from the original DataCollection_Rand trigger to become RandomNumberstoCribl.
- Populate the Lua table rolldata with the results of the integers produced in game.
- Iterate over the Lua table and call the bm_to_cribl.sendCriblData function.
-- Create the data object for submission over HTTP Post

-- If rolldata is equal to nil/null, instantiate the rolldata table object
if rolldata == nil then
  rolldata = {{rolls = {rand = matches.rand, random = matches.random, arc4 = matches.arc4random}, bm_tag = "rand_data"}}
else
  -- Otherwise, if the rolldata object exists, insert a new entry into the table object.
  table.insert(rolldata, {rolls = {rand = matches.rand, random = matches.random, arc4 = matches.arc4random}, bm_tag = "rand_data"})
end

-- For each time we match the trigger's regex, add a counter for the random data counter collected
randcount = randcount + 1

-- Print out the current randcount to the screen
echo("     |      "..randcount)

-- Logic to print the progress counter to the screen, or call the Script function bm_to_cribl.sendCriblData(v)
if randcount >= 100 then
  -- Once we have 100 rolls captured, iterate through the rolldata and submit the data to Cribl
  for k, v in pairs(rolldata) do
    bm_to_cribl.sendCriblData(v)
  end
  -- Reset the rolldata to nil/null
  rolldata = nil
end
With these updated code bits inside the Mudlet client it’s time to let the data fly! To trigger this automation the only piece left to do is to run the random command in-game and validate if we’re seeing the results we expect in LogStream. You’ll note a fourth column of numbers in the screenshot below. This is an added element that has been added in as part of the updated Mudlet trigger RandomNumbertoCribl by lines 12 and 15. With this we’re able to view the roll’s counter position which helps validate that our client’s appropriately firing reliably on the intended regex pattern.

Back to the LogStream
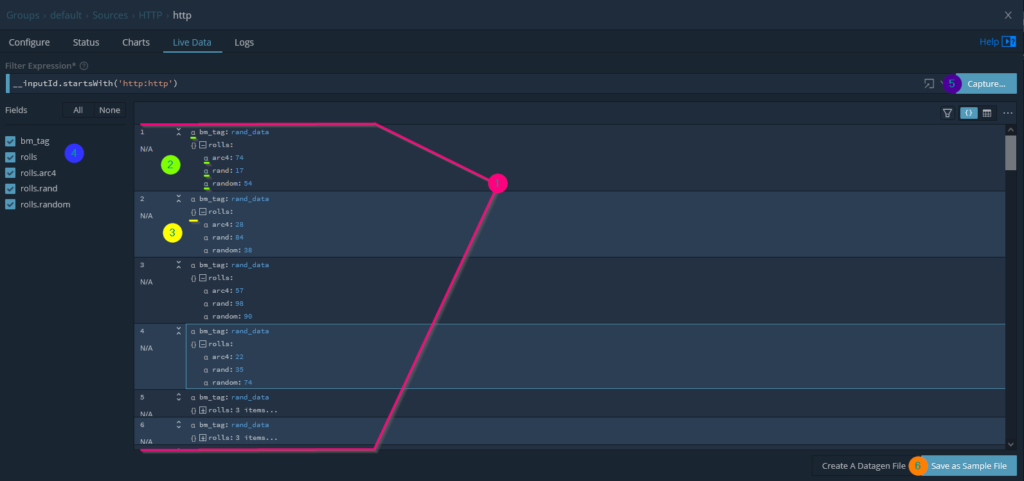
From back where we left off in the LogStream Cloud interface, with the configuration menu for the HTTP source, we’re going to leverage one of the options available to us to view Live Data. We have the opportunity to a few options when monitoring the data our source is recieving: Capture Time (in seconds), Capture Up to N Events, and lastly where to capture. The where piece is an opportunity to specify where in the LogStream pipeline we want to set our log sampling capture. For this use case we’ll be going with the default condition of viewing logs Before pre-processing Pipeline. This means that we’ll have the opportunity to view the logs in the raw, before any type of augmentation or translation has been applied.
In the screenshot below I made a few meaningful observations; some important to working with LogStream and others being important for where we intend to route this content to ElasticSearch.
- We’re able to very easily view the posted log contents, where each log collected provides a counter representing the order in which it was received.
- While the order isn’t so important for us in this use case, in other processes this could be important.
- The logs initially present themselves compressed, where keys containing nested objects indicate how many objects are present within the key.
- The interface gives representation of the data type. This is pretty key to understand as numbers cast as strings cannot always be applied to the same effect in services like ElasticSearch.
- Keys that represent containing additional sub keys within have a visual indicator representing this status. I anticipate a visual key would also be present if the key also contained an array of objects with the [] symbols.
- The left hand interface provides two key values to our review.
- Provides the name of all fields contained within the captured data set.
- Enables the ability to toggle the visibility of any fields presented. This can be very powerful if are working with complex data or large data object trees.
- It’s very easy to start all over and create a new capture. Doing so will erase all of the content we’re able to view from the previous capture… unless we
- Save the captured data! The coolest feature of this interface. By saving out our data sample we can apply this in later steps to create pipelines or as a reference for how this data was presented at the time we on-boarded this log source. Nifty!
In Summary
And that my friends is what we call a success. Getting data from point A to B isn’t always the end. The first time you get a successful connection between two disparate systems is quite commonly the beginning of the tasks ahead. And that sentiment is true even here. Why, there’s plenty of opportunity to make many aspects of this integration much more efficient or expand the scope to potentially include additional data elements.
Whether you skimmed the touch-points or dove deep to explore this topic ad nauseam, you have my appreciate and thanks for showing interest in the science of Data Engineering. Be sure to stop back by for Part 2 where we’ll finish the pipeline and bring these random numbers from the hills of Cribl-land, home of the data-goats, and into the depths of Elastic’s great eye of Kibana.
